This guide will show you the five most popular Lightroom effects.
In my years of using Adobe Lightroom, I’ve experimented with many different effects.
Lightroom’s effects are used to replicate distinct in-camera effects or add creative flare to photos.
Let’s dive into the tutorial.
HIGHLY RECOMMENDED
Popular course reveals the simple tricks to getting incredible results with Lightroom in record time.
Give Your Photos The Look They Deserve!
Five Popular Effects in Lightroom
Lightroom effects are used to generate incredible visual results, such as polarized sunsets, retro portraits, and stunning black-and-white photos.
There are endless creative possibilities for impressive jaw-dropping visuals using Lightroom.
For this tutorial, we’ve selected five of the most popular effects used by professional photographers.
We’ll not only show you these effects but also how to replicate them using Lightroom’s Develop module.
Get ready to be creative.
Lightroom Fog Effect
The fog effect is used to add an eerie atmosphere to a photo.
When silhouettes are half visible in a cloud of fog, it creates a suspenseful mood.
Alternatively, a fog effect can be used to soften an image, making it appear ethereal or otherworldly.
If you have a bland image, adding fog can make the image more intense and dramatic.
So, let’s jump in and add the fog effect using Lightroom.
For this tutorial, we will use a summer’s day photo of a forest to show how dramatically fog can change the photo’s mood.
Nothing looks as moody and mysterious as a mist drifting through a woodland.
To start, we’ll select the Mask tool.

Open your image in Lightroom’s Develop mode.
Then, open the Mask panel by clicking the dotted circle icon under Histogram.

When the Mask panel opens, click Brush or hit K for the keyboard shortcut to open the Brush tool.
Before applying a mask to your photo, tick the Invert box in the top right of the Brush panel.
We will use the Brush tool to mask the areas where we wish to add fog.
Whenever you need to adjust the brush size, use the Size slider.

We want to add fog to the areas between the trees and scrub in front of the trees.
Using the Brush tool, we’ve brushed over these areas.
As you brush, the red areas will be erased.

Once the area is brushed over, use the Tone sliders to add a fog effect.
Exposure and Contrast are decreased while Whites and Blacks are increased.
To view the edit, unclick the Invert button.
As you can see in the image below, the Tonal changes have created an effect similar to fog.

If there are areas where the fog is too dense, you can erase it using the Eraser tool.

By decreasing the Flow of the Eraser, you can partially erase the fog.
This allows you to alter the fog’s opacity in specific areas.
We used the eraser to decrease the density of the fog on the trees’ edges and on the foliage in front of them.
Now the image is finished, the fog effect has added an atmosphere of mystery to the once-sunny forest photo.
Lightroom Polarizing Effect for Sky
Photo editors also use Lightroom to simulate photography effects post-shoot, such as the polarizing effect.
The polarizing effect is a popular way to amplify a photo’s dramatic impact, particularly in landscape and architectural photography.
It darkens skies, improves saturation, suppresses glare, and reduces reflections.
For this tutorial, we will use Lightroom’s Masking and Curve tools to add a polarizing effect to the photo’s sky.
Using this Lightroom technique, you can choose which area of the photo you wish to add the effect to.
This is different from using a Lightroom preset, which would add a polarizing effect to the entire image.
Click the Masking button, which is the dotted circle in the top right corner of the Develop panel.

When the panel opens, you will find three buttons under Add New Mask; click the middle icon, the Sky button.
Lightroom will automatically select and mask the sky area in the image.
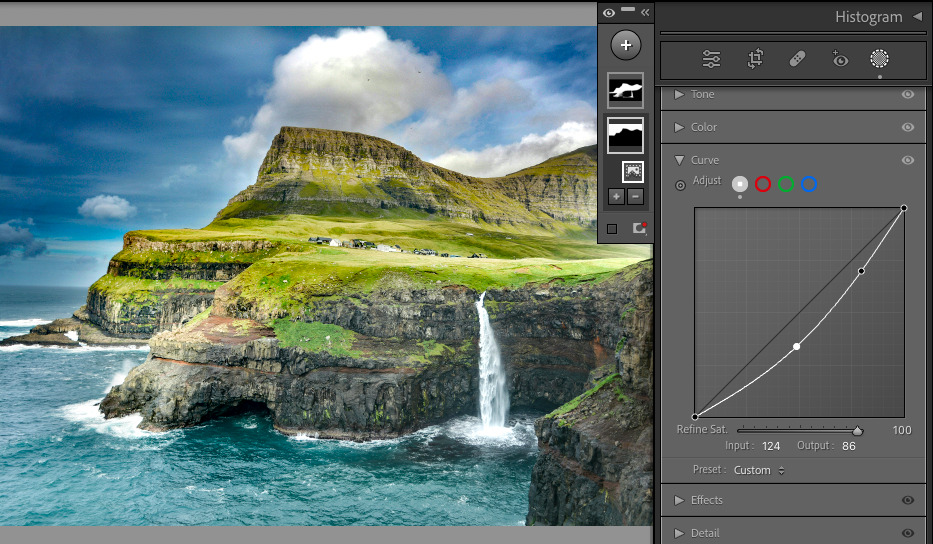
Using the Masking tool, we can select the area of the image we wish to edit. In this image, we are editing the sky.

We will now adjust the sky’s tones to create a dramatic polarized effect.

Open the Curve panel and ensure the first circle icon, the grey icon, is selected.
Now, drag the curve downwards to darken the sky. tweak the curve’s position to suit the sky’s color in your image.

Once we achieved the desired polarizing effect for the sky, we created a new mask for the landmass.
Using the same method, we increased the saturation of the green grass and cliff.
The polarizing effect is great for images that have incredible composition but dull, drab colors.
The intensification of colors will add vibrance to the image, making it more appealing.
Lightroom Grain Effect
Photographers use the grain effect to give an image an antique vintage look.
Digital photos consist of square ‘grain,’ otherwise known as pixels, while photos taken with film consist of round grain made up of silver metallic particles.
Adding a round grain effect simulates the appearance of an olden-day or retro photo.
You might choose to add the grain effect to a portrait to create an era-style image.
To create the grain effect in Lightroom, open your image in the Develop module.
When in Develop mode, head to the right-hand panel and click on the arrow beside Effects.

The Effects editing area will open.

Here, you will find the Grain sliders below the Vignetting editing area.
By default, the Amount slider is set to zero, the Size to 25, and the Roughness to 50.
Slide these to create the desired Grain effect.
For this step of the tutorial, we’ve chosen to use a monochrome photo of a young man.
His bomber jacket gives the appearance that the photo could have been taken in the ’70s.

The Amount slider has to be moved above zero before the Size or Roughness sliders will work.
Below, we’ve moved the amount slider to 3, and the other two sliders are set above 90.
Little change is noticeable in the image as the amount of grain (3) is too low.

In the image below, the amount of grain has been increased to 100, while the Size and Roughness sliders are left set above 90.
The grain is now noticeable but makes the image look too dark. To lighten the image, we will use the Tone Curve.

Click the arrow beside the Tone Curve to open the Tone Curve editing area.
Click the first circle icon to adjust the photo’s contrast.
You can adjust the shading and contrast by moving the Highlights, Lights, Darks, and Shadows sliders.
Alternatively, you can drag the curve bar up or down.

When the photo’s exposure is corrected, we find the grains in the image now appear too large.
Return to the Effects editing area to adjust the size, amount, and roughness of the gain.
In our case, we decreased the grain’s size, amount, and roughness to achieve the desired grain effect.

If you love the vintage vibe, you can also try adding a sepia tone to your image, as shown below.

We’ll show you how to add sepia effects in another of our Lightroom tutorials.
Lightroom Vignette Effect
The Lightroom vignette effect is one of the simplest effects to master and use.
The bonus of using it is that it instantly creates an alluring frame for photos.
Photographers use the vignetter to focus the viewer’s eye by highlighting areas of a photo.
When your image is open in the Develop module, open the Effects editing area.

When the Effects area is open, you will find the Post-Crop Vignetting sliders at the top of the panel.

Using the sliders, you can create a subtle vignette effect or a more impactful one.
For this technique, we’ve selected a photo of a woman on the beach.

The first slider in the Post-Crop Vignetting area is the Amount slider.
Slide the Amount slider to the right for a white vignette effect or to the left for a black vignette effect.
The transparency of the vignette will decrease the further the slider is set to the left or right.

The next slider sets the vignette frame’s midpoint.
The third slider, the Roundness slider, will change the shape of the vignette border from round to oval.

The fourth slider will feather the Vignette’s edges, while the fifth adds highlights.

Through experimentation, you will find the vignette effect that best suits your image.
Lightroom Monochrome Effect
The monochrome effect can turn an average photo into a work of art.
Let’s admit it: colors are amazing, vivid, and vibrant. They pop out from an image demanding our attention.
Advertisers know this all too well and, for decades, have used color theory to seduce viewers to buy their products.
However, colors can also be distracting, and contrasting colors can confuse the viewer’s eye.
Monochrome does more than simply strip the image back to the pure black and white basics.
When an image is black and white, its textures become more visible. Wood’s grain, cloth’s weave, and skin’s wrinkles have a new intriguing appeal.

I have chosen to add a black-and-white effect to the image above because of its diverse textures.
The crumbling concrete wall, the medieval cobblestones, and the tiled roof all contrast beautifully with the motorbike’s smooth metal body.
However, when the image is colored, the eye is distracted from the photo’s lush textures.
To add the monochrome effect to an image, first, select an image from the library and open it in Lightroom’s Develop module.

On the right-hand side panel, click the downward arrow beside Basic.

This will pop open the Basic editing area.

In the top right-hand corner of the Basic area, you will find the Black & White button.
Click this, and the image will automatically be converted to monochrome.
This is the standard grayscale conversion. It might look good, maybe even better than average, but we want to make it extraordinary.

The conversion has stripped away the distracting colors, and the texture is now more obvious.
To adjust the greyscale shading and contrast, adjust the Tone sliders.
You will find these in the Basic area under the WB sliders.
In the example below, the Exposure, Contrast, Highlights, Shadows, and Whites sliders have all been increased, while the Blacks slider has been decreased.
The image now appears to be slightly overexposed; its contrast and shading are subtle.

In the next example below, the tone was adjusted to increase contrast, highlights, and blacks while reducing shadows and whites.

The image’s contrast and shading look more detailed, although some of the motorbike’s detail is lost in the black areas of its body and tires.
To fine-tune specific areas of the greyscale, we will use the B & W editing area.
When the Black and White button is clicked in the Basic editing area, the HSL/Color option is replaced by the B & W option.
Click the arrow beside B & W to open it.

Here, you will find the eight color sliders.

Each slider targets one hue: red, blue, yellow, etc.
In the example below, the red slider was moved to the right, which lightened the red hues in the image.
As you can see, the bike’s red hues were lightened, while other colored areas of the image remain unaltered.

In the image below, the slider was moved to the left, and the red tones of the image darkened.

Using the B & W hue sliders, an editor can edit the tones of specific hues.
The adjustments can be fine-tuned to amplify the contrast in the photo’s diverse textures.
In the bottom right-hand corner of the B & W editing area is an Auto button.
Click this button, and Lightroom will make automatic adjustments to the photo.
Below are the automatic corrections Lightroom made.

Lightroom’s B & W Auto option is useful as a rough indication for settings.
Lightroom has a Black and White preset collection, including B&W Landscape, B&W Flat, and B&W Soft.
To use a preset for a quick fix, head to the Preset editing area on the left of the Develop canvas workspace.
Hover your cursor over a preset to view its preview in your workspace, and click it if you wish to apply it.
The B&W Punch preset was used below.
The effect is definitely punchy, but it lacks the finer tones of the grey scale that we are looking for.

You can experiment with different monochrome effects.
When you immerse yourself in the monochrome world, you will start to notice how intoxicating the many shades of grey are.
Simple black-and-white images with less grey tones are effective for dramatic silhouettes.
Subtler shades of greys are the best for accentuating detail.
Every prolific photographer has a surplus of ‘almost’ fantastic photos that are not quite up to scratch.
Adding a Lightroom effect can transform an average image into an intriguing one with a few simple editing tweaks.
However, if you prefer to use a preset to simulate effects, you can. Just upload one to Lightroom and apply it; it’s that easy.
But there is great joy in creating the effects manually.
We hope you learned editing tricks to help you create awe-inspiring images.
If you have a favorite Lightroom effect, please share it in the comments.
If you enjoyed this tutorial and would like to learn more about Lightroom, check out – How & When to Use the Tint Slider in Lightroom.
FAQ
Does Lightroom have effects?
Yes, Lightroom has effects. In Lightroom’s Develop module, you can open the Effects area.
Here, you will find two options: Post-Crop Vignetting and Grain.
You can also use presets in Lightroom to add effects to photos.
Which preset is best in Lightroom?
There are millions of presets that can be uploaded to and used in Lightroom.
Some of the most popular presets are the ones that achieve a black-and-white, monochrome effect.
Portrait presets are incredibly popular, covering a vast range of styles from gothic to summer days.
Which Lightroom preset is best will depend on a client’s preference and what suits the photograph.
Check out this guide to the best free Lightroom presets.
Can you add special effects in Lightroom?
Yes, you can add special effects in Lightroom.
To add special effects in Lightroom, you can use a preset, the Basics area, or the Effects editing area.
What are the key features of Adobe Lightroom?
Adobe Lightroom is a software application used by photographers to edit and store photos.
Using Adobe Lightroom, a photographer can do many things, including correcting white balance, lighting, and exposure post-photo shoot.
Credit : Source Post


