This guide will give you the easiest ways to generate objects using AI in Photoshop.
I’ve been using Adobe Photoshop for many years and regularly need to replace or add objects to images.
Adding objects can transform an ordinary image into an extraordinary one and completely alter the narrative of the photo.
Let’s dive into the tutorial.
HIGHLY RECOMMENDED
Download a free copy of Adobe Photoshop to follow along with this simple tutorial.
How to Use AI to Generate Accessories for Portraits
Since its creation, designers have used Photoshop’s powerful software to add objects to photos.
There are many reasons why people add items to photos. Artists do it to create an artistic or surrealistic image.
Photo editors will add items to fix up a photo. Designers might add an item to simulate the perfect advertising material.
Before the introduction of AI, adding objects to a photo was time-consuming and required advanced Photoshop skills.
Not only did the perfect image of an object need to be found, but it had to be cut and resized, and colors had to be matched.
Lighting had to be altered and shadows created to successfully merge the object with its new background.
Today, Photoshop’s AI effortlessly generates lifelike objects, cutting out hours of laborious editing work.
If the item you wish to add to a photo does not need to be a specific one, then AI is perfect for the job.
Step 1 – Open the Image
Generative Fill is only available in some versions of Photoshop, so before you start, check your version of Photoshop is version 25.0.
For this tutorial, we will use a portrait of a plainly dressed woman. The portrait is reminiscent of medieval times.
The photo intrigues me. The woman’s face looks noble, but her attire implies she is of a lower status.
The intention is to add a touch of glamour to the photo and alter her apparent status.
To do this, we will prompt Photoshop to add gold jewellery and a Victorian-era dress.

To open your image, head to the main menu and click File > Open. A dialogue window will open. Locate your image and hit Open.
Step 2 – Create a Selection
We will now create an active selection of the area to which we wish to add the item.
Head to the toolbar and select the Lasso tool. Alternatively, click L for the keyboard shortcut.
The Lasso tool is useful when making quick selections that don’t need to be intricate or precise.
The first item we wish to add is a gold necklace. To do this, we will create a selection in the area where we want Photoshop to place the necklace.
Click on the canvas and drag the cursor to draw a selection.
For the creation of this object (a necklace), the selection doesn’t need to be too precise.
This is because Photoshop recognizes information in the surrounding areas of the photo when producing the necklace.

Release your cursor, and an active selection will appear, depicted by a line of marching ants.
Below the selection, the Contextual Task Bar will appear.
If the Contextual Task Bar hasn’t appeared, you can access Generative Fill via the main menu.
Head to Edit > Generative Fill.
Step 3 – Insert a Text Prompt
In the Contextural Task Bar, click on the Generative Fill button to open the Generative Fill Bar.
The Contextural Task Bar will now be replaced with the Generative Fill Bar.
Enter a text prompt in the text box. This can be one or more words.
The more concise the prompt is, the easier it will be for Photoshop to create the exact item you envision.
Remember, you don’t have to stick with the first item generated. You can enter new prompts and generate new versions.
We wish to generate an antique gold necklace, so we have entered the prompt as exactly that: “Antique gold necklace.”

Now, hit the Generate button.
A pop-up window will appear as Photoshop starts working to generate the item.

If you make a mistake when entering a prompt, click the Cancel button and start again.
It only takes Photoshop a few moments to produce three different variations of the object.
Photoshop will create a separate layer for the new item in the Layers panel.

You can turn the item on or off as you wish.
This means the original photo below the item will remain untouched.
Step 4 – Select a Version
Photoshop will have created three unique items based on the text prompt entered.
Head to the Properties panel, and click on the arrow bedside Variations.
A box will appear below the arrow displaying three or more different styles of necklaces.

Click on any variation, and it will be displayed in the canvas workspace.
Below are the three different antique gold necklaces that were created by Generative Fill.
Sometimes, Photoshop misses the mark. As you can see, the first of the three necklaces looks more contemporary than antique.

Although the second option looks more like a necklace, it has an unnatural twist on the right side.

The third option is the most suitable of the three necklaces.
As you can see, the necklace looks somewhat antique and realistic.
The necklace follows the contours of the woman’s neck, and the shading and lighting is accurate.

Step 5 – Regenerate
If you are unhappy with any of the variations Photoshop has produced, you have the option to regenerate.
Click the Generate button again, and three or more versions will be created.
To do this, the selection and layer must still be active.
Alternatively, you can enter a new text prompt and click Generate.
Below, you can see the three new versions created when the text prompt was changed to “gold necklace.”

Step 6 – Generate a Different Item
We want to try a different necklace style before committing to the choker necklace as the final choice.
To do this, we will create a new selection.
Before creating a new selection, click the eye tool on the “Antique gold necklace” layer to hide it.
Click on the background layer in the Layers panel.
Now, using the Lasso tool, we will create a new selection. Instead of a chocker-style necklace, we will create an elongated chain necklace.
To do this, we will lower the selection and make it thinner.
Photoshop will create an item to fit the space it has been allocated.

The text prompt entered is “chain necklace.”
To view the different variations, click on the arrows in the Generative Fill bar.

As you can see, Photoshop’s AI has masterfully created a chain necklace, including realistic lighting and shading effects.
The shape of the necklace follows exactly the outline of the selection.
The more you work with Photoshop’s AI features, the more familiar you will become with them, making them easier to master.
Step 7 – Create Earrings
Next, we will create a selection to add an earring for the lady’s one visible ear.
We will use the Elliptical Marquee tool to create a perfect oval selection.
Head to the toolbar, select the Elliptical Marquee tool or click M for the keyboard shortcut.
Click on the canvas and drag the cursor across the area you wish the earring to be positioned.

Click the Generative Fill button in the Contextual Task Bar that appears.
Enter the keywords in the prompt bar. We have entered “Antique earring.”
As you can see below, Phtohsop’s AI has perfectly positioned the earring to hang naturally.

Click on the arrows to see the different versions and find the item that best fits the project.

If you’re unhappy with all of the earrings, you can generate them again, and Photoshop will create three more variations of the earrings.

One thing to note when working with Generative Fill is that you can not generate items on top of existing Generative Fill layers.
If a selection is created over a selection, Photoshop will usually not generate anything.
Step 8 – Create a New Dress
For the final touch, we will create a new dress. First, the background layer is activated in the Layers panel.
Using the Lasso tool, a selection is made around the dress. As you can see below, it is a rough selection and doesn’t include all of her dress.
If you want to make a more concise selection, you can use a precision selection tool, such as the Quick Selection tool.

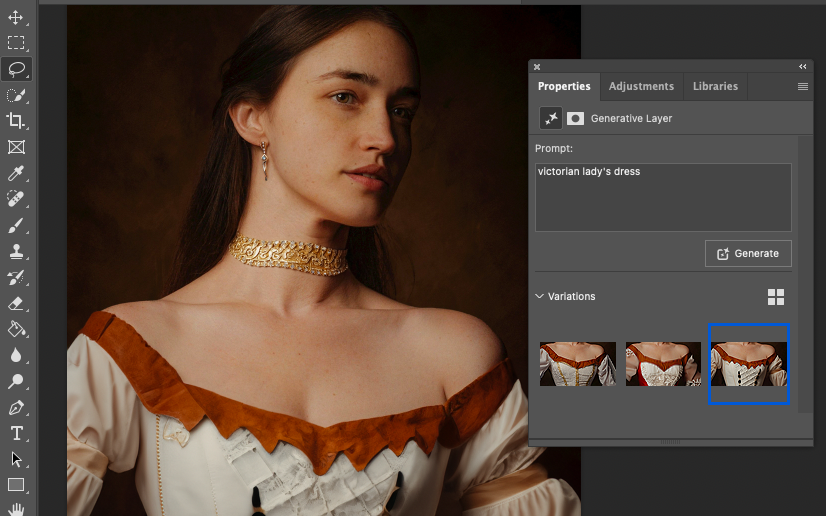
The prompt entered is “Victorian lady’s dress” to create a period-style dress.
Click the Generate button, and Photoshop will automatically generate three variations of the Victorian dress.
As the selection was rough, Photoshop left the top of the dress the same color as the original dress.
Click on the variations created to see which best suits the photo.

The Layers panel will have a layer for each new item: earrings, dresses, and necklaces.
If you wish to change the combination of items in the photo, simply activate one of the layers and run through the different variations.

The image below is my favorite combination of earrings, necklaces, and dresses.

It is amazing to see the portrait of the young woman changed from a plain working woman to a noble lady.
Here is the original image for comparison; you can see how a few items have completely altered the image’s narrative.

Step 9 – Flatten the Image
When you have created a fantastic image and wish to save it to share or print, you must first flatten it.
Head to the main menu and select Layer. Scroll down the drop-down menu underneath. At the very bottom, you will find Flatten Image; select this.
Check the Layers panel to see that all the layers have been merged into one layer.
Step 10 – Save the Photo
To Save the Photo, head to File > Save.
The Save dialogue window will pop up. Enter a name for the photo and select the location to which you wish to save it.
Beside Format, select JPEG, then click the Save button in the bottom right-hand corner of the window.
And that’s it – you’re done!
I hope you enjoyed this tutorial and can use this editing technique in your future designs.
This method can open up a world of creative perspectives. By using it, you can add all types of items to your photos, such as furniture, animals, or people.
Photoshop AI is incredibly fast and imaginative when generating items. The possibilities of creative design are only limited by your imagination.
Remember that creating a precise selection is not essential when making Generative Fill objects in Photoshop.
However, the more exact the selection is, the easier it will be for Photoshop to discern where to place the item.
Entering concise text prompts is crucial to help guide Photoshop to make exactly the item you envision.
If you liked this tutorial, I think you will also enjoy – How to Swap Backgrounds Using Photoshop AI.
Happy editing.
FAQ
How do I create AI in Photoshop?
To create with AI in Photoshop, first make a selection using a selection tool.
The Contextural Task Bar will appear below the selection.
Click on Generative Fill to access the text prompt box. Enter the text prompt in the box and click Generate.
Photoshop’s AI will generate three versions of the image based on the text prompt entered.
How do I turn on generative fill in Photoshop?
To access Generative Fill in Photoshop, head to the main menu and select Windows.
Scroll down the drop-down menu and click on Contextual Task Bar. The Generative Fill bar will now appear when an active selection is created.
Does Photoshop have AI tools?
Yes, Photoshop has AI tools. Content-aware, Generative Fill, and Generative Expand are just a few of Photoshop’s AI tools.
Why can’t I use generative fill in Photoshop?
You might not be able to use Generative Fill in Photoshop for different reasons.
Possibly, the version of Photoshop you are using is incompatible with Generative Fill. Check if the version of Photoshop you are using has Generative Fill.
Another reason is that there is no active selection in the canvas workspace; Generative Fill will only work if there is an active selection.
Credit : Source Post


