This guide will give you the easiest ways to make a photo vibrantly pop in Lightroom.
I’ve been using Adobe Lightroom for many years and often need to add vitality to dull photos.
Using Lightroom’s tools helps you to add vibrance and energy to party photos.
Let’s dive into the tutorial.
HIGHLY RECOMMENDED
Popular course reveals the simple tricks to getting incredible results with Lightroom in record time.
Give Your Photos The Look They Deserve!
How to Add Party Pop to a Photo in Lightroom.
So you have a collection of fabulous party images, the composition is fun, the guests are laughing, and the decor is attractive.
The only problem is the photos lack that essential party pop.
Instead, they look flat and lifeless, which, as we all know, will not make the viewer feel the party vibe.
When a photo lacks pop, pretty much nothing will make it look fun – even if it’s full of happy people, a giant birthday cake and pretty party decorations.
Luckily, you don’t have to discard your images. Using Lightroom, we can convert a dull photo into one bursting with life to create an exciting, dynamic image.
So, let’s begin. Open Lightroom and prepare to add that essential party pop.
Step 1 – Open the Image
Head to Lightroom’s library and click on the image you wish to select.
To open the image in the Develop module, hit Develop at the top right of the workspace.

For this tutorial, we will use a photo of guests dancing at a wedding party. It has the perfect composition for a lively party photo.
However, this photo is dull and lacks vibrancy. The intense backlighting has cast shadows over the guests dancing in the foreground, making the image underexposed.

To add the pop factor, we will first use the Basic panel to add vitality and increase overall exposure.
Step 2 – Basic Adjustments
Open the Basic editing panel by clicking the triangle icon beside Basic in the right-hand panel.
The Basic panel will drop open.
In the Basic editing panel, you will find sliders for refining the image’s exposure, color and vibrance.

The first editing sliders in the panel are Temp and Tint; we will ignore these two for now and begin by correcting the image’s exposure.
Step 3 – Exposure
The photo is underexposed, so we will increase the exposure by shifting the Exposure slider to the right.
We don’t want to overexpose, so we only move the slider slightly. The adjustment we have made for this image is + 0.75.

It can be tempting to slide the Exposure slider further to the right to fix the exposure.
However, we have to be careful when editing in Lightroom not to make drastic changes as this can affect the quality of the photo.
Step 4 – Contrast
The next slider is the Contrast slider. The Contrast slider determines the distance between light and dark.
High contrast between shadows and light can help increase drama and enhance vitality in a photo,
However, in this photo, it will work in our favour to reduce the contrast.
Decreasing the contrast will soften the disparity between the glaring backlight and dark shadows, allowing the viewer to focus their attention on the dancers.

The Contrast slider is moved to the left and set at – 19.
Step 5 – Highlights
The Highlight slider targets bright areas and will heighten detail in the brighter areas of the image.
In this photo, the man dancing at the back of the picture, under the spotlight, is blown out and overexposed.
We could decrease the highlights to regain finer details in his face and clothing.

Moving the Highlight slider to + 19 reveals the hidden details in the man’s face and shirt.
Step 6 – Shadows
The Shadow slider targets the image’s medium to darker tones.
We move the Shadow slider to the right and set it to +17 to recover lost detail in the dancers.
Step 7 – Whites and Blacks
The White slider adjusts the overall brightness of an image by redefining the white point.
You can use the White slider to correct underexposure by adjusting the white point to a purer white.
In this photo, we cannot use the White slider to adjust exposure because parts of the image are already pure white.
If your party image has an off-white as the white point (whitest point), slide the Whites slider to the right to create a brighter white.
When an image has the purest white as its white point, it brightens the scene, making it pop.
The Blacks slider is similar to the Whites slider. It adjusts the image’s black point.
Amp up the blacks to the darkest black to maximize the dynamic range in the image.
Step 8 – Clarity
Using the Clarity slider only affects midtone contrast and can be used to add a hard, crunchy effect.
We have increased the Clarity to +28, which gives the image a defined structure in the mid range.

Step 9 – Vibrancy
The Vibrance slider adds a subtle brightness. It increases the intensity of dull, muted colors without affecting saturated colors.
Raise the Vibrance by sliding the Vibrance slider to the right. The image’s overall tone will lift.

As you can see in the image above, we have added a significant pop factor to the image using the Basics editing panel.
The photo now has added vitality, but it isn’t fully popping. One reason for this is that the background does not contrast the guests; instead the background and subjects visibly merge.
The other is because the dancers are still slightly under-exposed.
We will use Lightroom’s Masks to create the necessary contrast between the subjects and the background areas.
Step 10 – Subject Mask
Masks are one of the editing master’s tools in the quest for ultimate perfection.
Using a mask allows you to target anything from a subject’s face to the sky to a single shoe.
We will first make a mask for the dancers. Open the mask editing panel by clicking the circle icon below the Histogram.
The Masking editing panel will open.
To create a mask, click one of the three buttons at the top of the panel, and Lightroom’s AI will discern and select the background area.
To select the people, you can click the Subject button. Alternatively, you can click the Background button and invert the selection.

Click a masking button, and a red overlay will cover the masked area.

If you wish to invert the mask, click on the mask’s thumbnail and select Invert “mask” from the drop-down menu.

When the image is complex, it’s unlikely that Lightroom’s AI will make an accurate selection.
In the image above, Lightroom mistakenly included some parts of the dancers in the background mask.
Click the subtract or plus symbol below the mask’s thumbnail to edit the mask. You will find the mask thumbnail in the top right-hand corner of the canvas.
Click the minus symbol to subtract from the mask or the plus symbol to add to the masked area. Select Brush from the drop-down menu that appears.

You can adjust the brush’s size, flow, density or feathering using the sliders in the editing panel if needed.

Using your cursor, click and drag the Brush tool over the masked areas you wish to edit.

Now that the dancers are masked, we can use the Basic panel to increase vibrance and exposure without affecting the background.

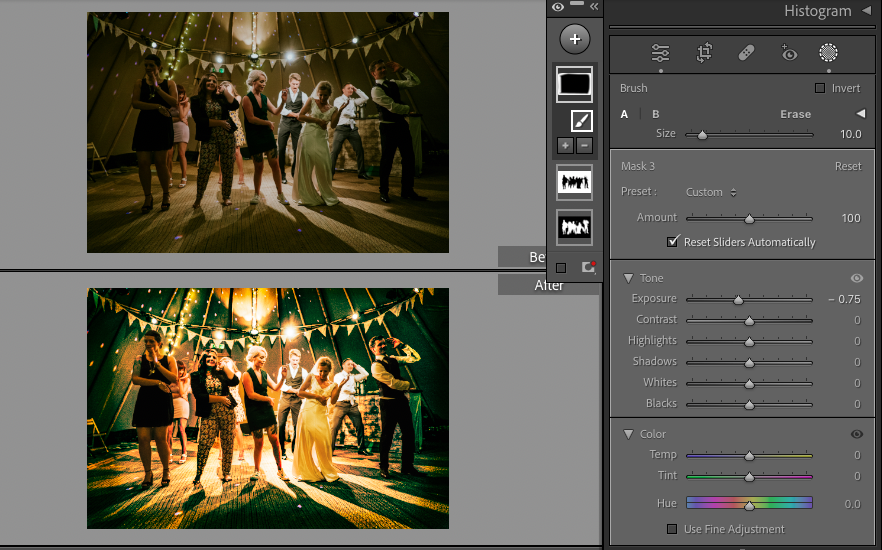
At this point in the editing process, it’s worth comparing the original image to the edited image. This will give an indication of the image’s progress.
To activate the Before and After preview, click the YY symbol on the bottom left of the canvas.
Step 11 – Background Mask
When we are happy with the edits made to the subjects, we will create a mask for the background.
To do this, we will duplicate the first mask and invert it.
To do this, click the mask and select the third option from the drop-down menu – Duplicate and Invert Mask.
To create a contrasting background, we will use the Curve tool to adjust the background’s tones and colors.

Select the color channel you wish to target by clicking one of the red, green or blue circles above the graph.
In the image above, the green channel is selected. In the photo below, red is targeted.
Click on the curve’s graph and drag the line upwards to increase the color or downwards to decrease it.
When red is selected, you can pull the line upwards to add red or down to add cyan (since this is the opposite of red).

We decided to use the green background for this image as it contrasts the dancers instead of blending. This helps to illuminate the party guests and add to the photo’s pop factor.
Step 12 – Vignette Frame
The background no longer merges with the foreground, but it still demands too much attention.
Although the lines of the floorboards lead our vision to the dancers, the contrast between shadow and light on the floor is distracting.
We can remedy this visual disruption by cropping the image or creating a framed vignette effect.
A frame will tone down the high contrast and help to focus the viewer’s eye on the dancers.
To create a frame, we will use the Post-Crop Vignette tool.
You will find the Post-Crop Vignette tool in the Effects editing panel.

Adjust the Vignette sliders to create your desired vignette shape.
Above, the Amount slider is pulled to +53, and a white vignette is created.
Below, the Amount slider is slid to the right to create a dark vignette effect.

Remember, you want the image to look energized and stylish without looking over the top.
Step 13 – Final image
Using Lightroom’s Before and After preview option, we can now compare the original and post-edit images.
This will help us see if we’ve successfully added that fun party pop factor to the image.
The original image’s colors were flat, and the dancers merged with the background, making it look lifeless and boring. The viewer would have questioned if the party really was fun.

Comparing the two images, we can see we added the much-needed pumping pop plus a pinch of punch.
Using Lightroom, we successfully took a boring image and injected it with much-needed dynamism.
It shows what one can achieve when using Adobe Lightroom.
This was a complex image to edit due to the strong backlight, creating high contrast and under-exposure areas.
Most images will be easier to add a pop to than this one. Just remember the essentials and increase the exposure, vibrancy, and clarity.
For example, below is an image of a girl at her birthday party. The image is a little listless. We will use the tricks we learned to make it look cheerful.

We open the image in Lightroom’s Develop mode and correct its exposure using the sliders in the Basics panel.
Next, we amp up the vibrancy and use the Clarity slider to add a defining structure.
By increasing its clarity and vibrancy and correcting the exposure, the vital pop has been added. The party scene now looks like a celebration rather than a dull day at school.

Now that you have all the editor’s techniques to make any photo pop, have fun trying it out.
If you have any techniques for adding pop to photos, please tell us about them in the comments.
We hope you enjoyed this tutorial. If you would like to learn more editing tricks, check out – How to Smooth Skin and Fix Skin Tones in Lightroom.
FAQs
How to make a picture pop in Lightroom?
To make a picture pop in Lightroom, use the Tone Curve.
Drag the Tone Curve’s curve into position to amp up the image’s vibrancy and saturation.
Increasing the image’s exposure and contrast can also add a pop factor.
How to make an object pop in Lightroom?
To make an object pop in Lightroom, you must first create a mask of the object.
This will allow you to edit the object without affecting the rest of the image.
When the object has been masked, use the sliders in the Basic panel to increase its vibrance and saturation.
Adjust the contrast and exposure, too, but don’t overdo it, or the image might begin to look unrealistic.
How to edit photos to make them pop?
You can edit an image to make it pop using photo editing software to increase the photo’s contrast, exposure and vibrancy.
Adding vibrance will illuminate the subject and set them apart from their background.
Sharpening the image by thickening and deepening the mid-tones will give it a distinctive structure.
Increasing contrast using the Contrast tool is another technique editors use to make a photo pop.
How do I make photos look like a disposable camera in Lightroom?
You can edit photos using Lightroom’s Develop module to create a disposable camera photo look.
Typically, disposable camera photos are distinguished by their thicker photo grain and warmer colors.
Open the image in Lightroom’s Develop module and add grain using the Grain sliders in the Effects panel.
Next, increase the photo’s warmer tones using the Temp slider in the Basic editing panel.
Credit : Source Post


