How to Clean Ear Pads (Step-by-Step Guide) | Clean Headphones Safely
Let me be honest — most people don’t know how to clean ear pads properly, and it slowly ruins their headphones.
I’ve tested headphones from brands like Sony, Bose, and Apple during long music sessions, gaming nights, and even travel. And one thing I keep noticing is this:
Dirty ear pads change everything.
After a few weeks of daily use, you start to notice:
- A weird smell
- Sticky or greasy feeling
- Less comfort during long listening sessions
Ever worn your headphones for hours and felt uncomfortable for no clear reason?
In my experience, it’s usually not the headphones — it’s the ear pads.
Here’s the mistake most people make…
They ignore cleaning until the pads are already damaged.
I’ve tested this myself. After using a pair daily for calls and music, I skipped cleaning for about a week. The result? Sweat buildup, dust, and a noticeable drop in comfort. After cleaning them properly, they felt almost new again.
Quick Answer: How to Clean Ear Pads Safely
To clean ear pads, gently wipe them with a slightly damp microfiber cloth. For deeper cleaning, use mild soap and water, avoid soaking the pads, and always let them air dry completely before using again.
Simple. But doing it the right way makes a big difference.
In this guide, I’ll show you:
- How to clean ear pads step by step without damaging them
- The safest methods for leather, fabric, and foam ear pads
- Common mistakes that can shorten your headphone’s life
No complicated tricks. No risky methods. Just practical steps that actually work in real use.
Because at the end of the day, I test headphones so you don’t waste your money.
So tell me — when was the last time you cleaned your ear pads?
Why Cleaning Your Ear Pads Is Important
I’ve seen this a lot — people blame sound or comfort issues on the headphones, but the real problem is dirty ear pads.
When you use headphones daily, sweat, oil, and dust build up fast. This can make the pads feel sticky and smell bad. Over time, it can even affect how the sound feels on your ears.
After using headphones for long calls and music sessions, I noticed one thing clearly. Clean ear pads feel better, sound better, and last longer. It’s a small habit that makes a big difference.
Types of Ear Pads and Why Cleaning Methods Differ

Not all ear pads are the same. And this is where many people go wrong.
Different materials need different care. If you use the wrong method, you can damage the pads quickly.
Leather / Protein Leather Ear Pads
These are common on premium headphones from brands like Sony and Bose.
They feel soft and smooth. But they can crack if you use too much water or harsh cleaners.
In my experience, gentle cleaning works best here.
Fabric / Cloth Ear Pads
These are softer and more breathable. Great for long listening and gaming.
But they absorb sweat easily. That means they can smell if you don’t clean them often.
Velour Ear Pads
Velour feels premium and very comfortable. I like using these for long sessions.
But they attract dust fast. You need regular cleaning to keep them fresh.
Foam / Silicone Ear Tips (Earbuds)
These are used in earbuds, not over-ear headphones.
They go inside your ears, so hygiene matters even more. I always clean these more often than regular ear pads.
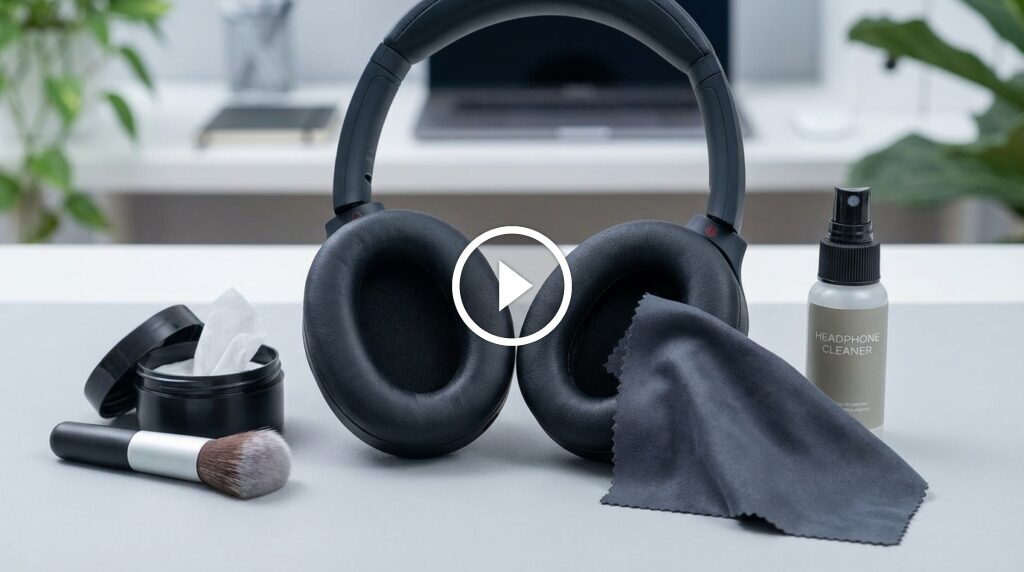
Tools and Materials You’ll Need for Cleaning
Good news — you don’t need anything fancy.
Most of the time, I use simple things I already have at home. The key is to use safe materials that won’t damage the pads.
Here’s what I recommend:
- Microfiber cloth
- Mild soap (no strong chemicals)
- Warm water
- Cotton swabs
- Soft brush (optional)
These tools work well for both quick cleaning and deep cleaning.
| Method | Safe | Best For |
|---|---|---|
| Dry cloth | Yes | Daily cleaning |
| Soap + water | Yes | Deep cleaning |
| Alcohol wipes | Careful | Disinfection |
I personally avoid strong cleaners. They can damage the surface and reduce the life of the ear pads.
How to Clean Ear Pads Safely (Step-by-Step)
This is the exact method I use after testing headphones for long hours.
Follow these steps, and you won’t damage your ear pads.
Step 1 – Remove Ear Pads (If Possible)
Check if your ear pads can be removed. Many headphones allow this.
Removing them makes cleaning easier and safer.
Step 2 – Dry Cleaning First
Use a dry microfiber cloth.
Gently wipe off dust and loose dirt. This step is simple but very important.
Step 3 – Use Mild Soap and Water
Mix a small amount of soap with warm water.
Dip the cloth lightly. Do not soak it.
Then gently wipe the ear pads. Focus on dirty areas.
Step 4 – Light Disinfection (Optional)
If you use headphones daily, this helps.
Use a slightly damp cloth or safe wipe. Avoid too much liquid.
Step 5 – Let Them Air Dry
This is where many people make mistakes.
Do not use heat. Do not rush it.
Let the ear pads dry naturally. I usually leave them for a few hours before using again.
After using this method for years, I can say this clearly.
Clean ear pads not only feel better, they make your headphones last longer.
How to Clean Ear Pads Without Removing Them
Not all ear pads come off. I’ve tested many models where they are fixed in place.
In that case, you need to be extra careful. Too much water can damage the drivers inside.
Here’s what I do:
- Use a slightly damp microfiber cloth
- Wipe gently in small circles
- Avoid pressing too hard
- Keep water away from the speaker area
For daily use, this method works well. It keeps your headphones clean without risk.
Deep Cleaning vs Regular Maintenance
You don’t need deep cleaning every day. That’s another mistake I see often.
In my experience, a simple routine works best.
Weekly Quick Cleaning
This takes just a minute.
- Wipe with a dry or damp cloth
- Remove dust and sweat
- Let it air dry
Monthly Deep Cleaning
This is more thorough.
- Use mild soap and water
- Clean all surfaces carefully
- Dry fully before use
When You Should Replace Ear Pads
Sometimes cleaning is not enough.
If you see these signs, it’s time to replace:
- Cracks or peeling
- Bad smell that won’t go away
- Loss of shape or comfort
I’ve replaced ear pads on old headphones, and it made them feel new again.
Common Mistakes That Can Damage Your Headphones
Here’s the mistake most people make…
They clean too aggressively.
I’ve tested different methods, and some can do more harm than good.
Avoid these:
- Using too much water
- Soaking the ear pads
- Using strong chemicals
- Scrubbing too hard
- Not drying properly
One time, I used too much liquid on a pair, and it took hours to dry. The comfort dropped after that.
So keep it simple and gentle.
Tips to Keep Your Ear Pads Clean Longer

Cleaning is good. But keeping them clean is even better.
From my daily use, these tips really help:
- Wipe pads after long use
- Avoid using headphones with sweaty ears
- Store them in a clean place
- Use a case when traveling
- Keep them away from dust
These small habits make a big difference.
In my experience, doing this keeps ear pads fresh for a long time.
Signs Your Ear Pads Need Cleaning or Replacement
Sometimes it’s obvious. Sometimes it’s not.
From my experience, these signs show up after regular use, especially during long music or gaming sessions.
Watch for these:
- Bad smell that does not go away
- Visible dirt or stains
- Sticky or greasy feel
- Cracks or peeling on the surface
- Less comfort over time
If cleaning fixes the issue, you’re good. If not, it’s time to replace them.
| Condition | Clean or Replace |
|---|---|
| Light dirt | Clean |
| Bad smell | Clean first |
| Cracks / peeling | Replace |
| Loss of shape | Replace |
I’ve replaced ear pads on older headphones, and the comfort came back instantly.
Best Products for Cleaning Ear Pads
You don’t need expensive products. Simple tools work best.
But if you want better results, a few good options can help.
From my testing, these work well:
- Microfiber cloth (safe for all types)
- Mild soap solution (best for deep cleaning)
- Antibacterial wipes (use carefully)
- Soft brush (for fabric pads)
I avoid strong chemical cleaners. They may clean fast, but they damage the material over time.
If you keep it simple, your ear pads will last longer.
Ear Pad Care Tips for Daily Use
Cleaning is one part. Daily care is just as important.
I use headphones for hours — calls, music, and testing — so I follow these habits.
- Wipe ear pads after long sessions
- Keep your ears dry before use
- Store headphones in a case
- Avoid leaving them in heat or sunlight
- Keep them away from dust
These small steps help a lot.
In my experience, this routine keeps headphones fresh and comfortable for months.
Quick Recap: Safe Way to Clean Ear Pads
Let’s keep it simple.
Here’s the safest method I recommend:
- Remove ear pads if possible
- Wipe with a dry cloth first
- Use a damp cloth with mild soap
- Clean gently
- Let them air dry fully
Avoid soaking or using too much water.
This method works for most headphones I’ve tested, from budget to premium.
Conclusion: Keep Your Headphones Clean and Comfortable
Cleaning ear pads is simple. But it makes a big difference.
From my experience, clean ear pads improve comfort, hygiene, and even the overall feel of sound. It also helps your headphones last longer.
You don’t need special tools. Just follow the right steps and keep it consistent.
Because at the end of the day, I test headphones so you don’t waste your money.
So tell me — which headphones are you using right now?
Frequently Asked Questions (FAQs)
How often should I clean ear pads?
You should clean ear pads once a week for light cleaning and do a deep clean once a month. If you use headphones daily or sweat a lot, clean them more often to avoid smell and buildup.
Can I wash ear pads with water?
Yes, but only lightly. Use a slightly damp cloth with mild soap. Avoid soaking the ear pads in water, as it can damage the material and affect sound quality.
Is it safe to use alcohol wipes on ear pads?
Alcohol wipes can be used carefully for disinfection, but avoid frequent use. Too much alcohol can dry out leather or damage the surface over time.
Can dirty ear pads affect sound quality?
Yes, they can. Dirt, sweat, and oil buildup can change how the pads seal around your ears, which may reduce sound quality and comfort.
How do I clean ear pads that cannot be removed?
Use a slightly damp microfiber cloth and wipe gently. Make sure no water gets inside the speakers. Always clean lightly to avoid damage.
Why do my ear pads smell bad?
Ear pads absorb sweat, oil, and dust over time. This causes odor. Regular cleaning and proper drying can help prevent bad smells.
When should I replace ear pads instead of cleaning them?
You should replace ear pads if you notice:
- Cracks or peeling
- Bad smell that won’t go away
- Loss of shape or comfort
Cleaning won’t fix these issues.
Can I use strong cleaners or chemicals?
No. Strong cleaners can damage the material and reduce the lifespan of your ear pads. Always use mild soap and gentle cleaning methods.
What is the safest way to dry ear pads?
Always air dry them naturally. Do not use a hairdryer or heat, as it can damage the material and shape of the pads.
Do different ear pad materials need different cleaning methods?
Yes.
- Leather → gentle wipe, less water
- Fabric/velour → careful cleaning, dries slower
- Foam/silicone → clean more often for hygiene
Using the right method helps your ear pads last longer.

Credit : Source Post