Would you like to learn how to make photo booth strips from your favorite photos?
I’ll show you how you can make your own in a few simple steps.
Back in the 1930s and 1940s, you could find photo booths in many public areas – from train stations to amusement parks.
You could make a photo strip with your friends, your sweetheart, or by yourself making silly faces. Photo booths became the easiest and most affordable way to immortalize a moment.
After many decades of glory, photo booths fell out of use once we all got a digital camera at hand right in our phones.
Fortunately, the vintage trend hit, and photo booths made a strong comeback. Today, many people hire photo booths for their weddings and events.
So, if you’re a vintage lover looking for a fun way to showcase your pictures, you’ll love making your own photo booth strips.
Let me show you how easy it is!
Materials
- Digital photos
- Canva or a similar software
- Printer
- Frame
- Xacto-knife
- Cutting board
Process
This is how easy it is to make photo booth strips. You can save the template to make as many as you like in the future just by changing the photos.
I hope you enjoy it.
Step 1
Firstly, select and resize the photographs you want to include in the photo booth strip.
You can choose whichever photos you want – that’s the advantage of making the strip a digital collage instead of using a real booth.
They don’t have to be from the same place, nor do you have to wear the same outfit. However, if you want your photo booth strip to look authentic, you should choose images from the same event or photo session.
Now, check that they are the right size for printing. Photo booth strips are small, and you’ll fit three or four photos in them – so you don’t need very big files.
Most modern cameras and phones will have enough size and resolution to use the photos for a photo booth strip. However, if you’re using old photos or ones you uploaded to Facebook, etc., then it’s better to check.
The ideal print resolution is 300 ppi. However, considering the size and purpose, you may be OK with even 150 ppi.
As for the size, decide how big you want the strip and how many photos you’ll put on it. In my case, I’ll print 2×6″ strips with three pictures in them.
So, my photos must be at least 2×2″ at 300 ppi.
To check the size of yours, you can use photo editing software such as Photoshop. Alternatively, you can use an online image size checker such as the one from Fine Art Printing.
Step 2

You can do this in Photoshop or other programs. I’ll show you how to do it on Canva because you can use it for free, it doesn’t require editing knowledge, and it has tons of templates to choose from.
How Much Do You REALLY Know About Photography?! 🤔
Test your photography knowledge with this quick quiz!
See how much you really know about photography…

On Canva’s home page, you’ll find a search bar. Type in “photo booth.”
You’ll get a wide selection of photo booth strip templates. Choose the one that you like best – remember that everything is customizable. So, this is just a starting point.
Make sure the design doesn’t have a crown on the bottom right corner – otherwise, you’ll need a Premium account to use it.
Step 3

Once in the design area, you can change, delete, and add everything you want. Click on any element to open the tools and settings.
You can use the left panel to find new elements for your design.
I’ll go for a clean look for this one, so I deleted all the graphics. I also adjusted the picture placeholders to be bigger to fit only three.
Canva automatically shows the dimensions and guidelines as you move the elements. Use them to create the desired design.
Step 4

On the left panel, click on the Uploads tab. Then, click on Upload files to open a browser window.
Find the photos on your computer and upload them to Canva.
Step 5

Next, click on the photo on the left and drag it into the picture placeholder on your design. Then, release the mouse button.
Canva centers the photo by default. However, you can double-click on it to reposition it inside the picture holder.
Repeat for all your images.
Step 6

Once you’re happy with the result, click the Share button in the top right corner.
Then, choose Download. If you’re using a free account, you won’t be able to resize it. That shouldn’t be a problem because you were working on a template, so it should already be the right size.
Otherwise, you can resize it using a photo editor.
Step 7

Repeat steps one through six for all the photo booth strips you want to make. You can use the same template or change it.
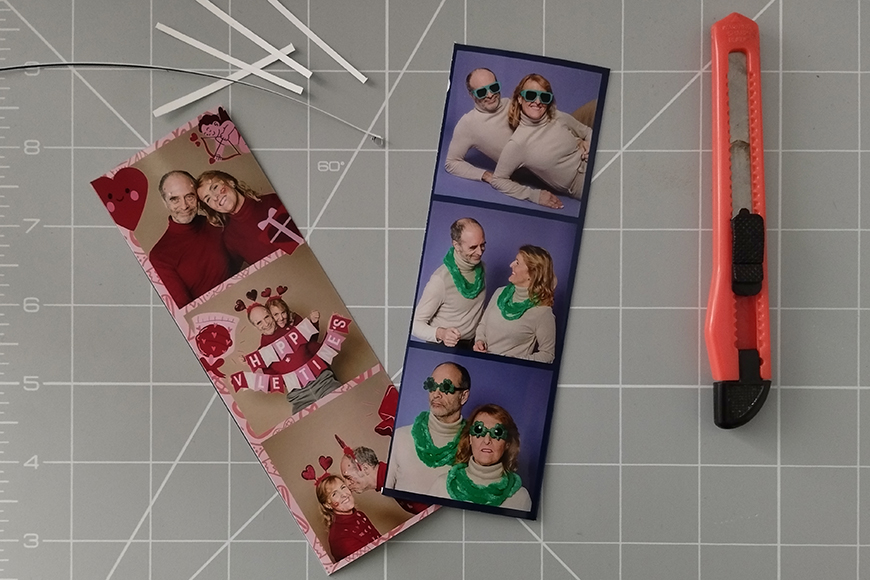
I made a second one with more festive graphic elements to match the Valentine’s Day theme of the photos I was using.
I decided to put the two of them together to fit in a 4×6″ printing paper and frame. I used Photoshop to paste both files into a single document.
Now, it’s time to print them. You can do it at home if you have a photo printer. If not, you can go to a photo kiosk or one-hour pharmacy lab or order them online.
Step 8

Once you have your prints, frame them as you like. And voila! You have some fun photo booth photo strips to display at home.
P.s. You might like to check out these tutorials on how to make DIY paper photo stands and how to make wooden photo holders for fun ways to showcase your photo strips.
Credit : Source Post


