Quick Answer
To select headphones in Windows 11, connect your device via Bluetooth or the headphone jack, then go to Settings > System > Sound, and choose your headphones from the output device list. This ensures your audio is directed to the intended headphones for optimal sound quality.
Hi, I’m Ryan Mitchell — an audio enthusiast and tech reviewer here to help you navigate your audio experience on Windows 11. Let’s face it, selecting the right headphones is more than just a plug-and-play affair. The latest system updates have added layers of complexity but also provided enhanced functionalities that can elevate your listening experience.
In this guide, we’ll dive into the essential steps to connect and select headphones in Windows 11. Whether you’re an avid gamer, a music enthusiast, or looking for clarity during calls, the right selection process can save you from a subpar experience. Let’s ensure you get the sound quality, comfort, and functionality you deserve.
Understanding Windows 11 Audio Settings
Before diving into the selection process, it’s crucial to familiarize yourself with Windows 11 audio settings. The interface is user-friendly, but knowing where to look can make a world of difference.

| Feature | Why It Matters | Best For |
|---|---|---|
| Bluetooth Connectivity | Provides wireless connection | On-the-go users |
| Sound Control | Adjust sound levels seamlessly | Audio enthusiasts |
| Device Management | Select and manage audio outputs | Daily users |
Why It Matters
Understanding these features allows you to utilize the full potential of your headphones. Whether you connect via Bluetooth or a cable, the right settings can drastically improve audio quality.
Always update your sound drivers for the best performance.
Connecting Your Headphones
The first step is to physically connect your headphones. Windows 11 offers multiple ways to do this: Bluetooth or wired. Let’s explore each.

Bluetooth Connection
For wireless users, connecting via Bluetooth is the way to go. Here’s how:
- Turn on Bluetooth on your headphones.
- Go to Settings > Bluetooth & Devices.
- Click on ‘Add Device’ and choose Bluetooth.
- Select your headphones from the list.
Once connected, you should hear a confirmation sound, indicating a successful pairing.
Wired Connection
If you prefer a stable connection, using the headphone jack is a foolproof method. Simply plug and play, but ensure you’re plugged into the correct port.

Ensure your headphone jack is properly inserted to avoid audio issues.
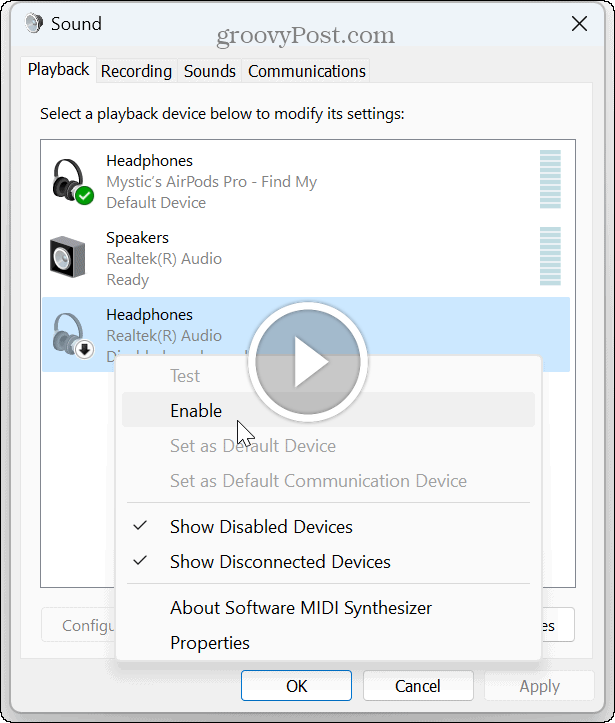
Selecting Your Headphones as the Output Device
Now that your headphones are connected, it’s time to select them as the output device in Windows 11.

Steps to Follow
- Go to Settings > System > Sound.
- In the ‘Output’ section, find and select your headphones from the list.
- Adjust the volume using the slider.
🎙️
For the best experience, ensure that your selected headphones are set as the default device.
Sound Quality and Customization
Once selected, the fun begins. Windows 11 offers sound customization features like equalizer settings that enhance your listening experience.
Using the Equalizer
A customizable equalizer can transform your audio experience. Here’s how to tweak it:
- Go to Sound settings.
- Click on ‘Device Properties’ for your headphones.
- Explore the ‘Enhancements’ tab to adjust settings like bass and treble.
These tweaks can cater to personal preferences, providing a richer sound tailored to your needs.
Some headphones come with their own apps for even more control. Check their availability for enhanced features.
Common Mistakes to Avoid
While connecting your headphones seems straightforward, common pitfalls could hinder performance. Let’s avoid them.
Avoid using incompatible drivers for Bluetooth devices as it can cause connectivity issues.
- Ignoring Updates: Regularly update drivers to eliminate bugs and performance issues.
- Overlooking Settings: Double-check your Windows audio settings if the sound isn’t right.
- Mismatched Ports: Plug headphones into the correct audio port to ensure optimal sound.
Who Should Consider This Guide?
Whether you’re a gamer, a professional attending virtual meetings, or an audiophile, connecting and selecting optimal headphones is crucial for different scenarios.
Gamers
Precise audio is non-negotiable for an immersive experience. Adjusting equalizer settings can provide a competitive edge.
Music Lovers
For rich soundscapes, tailor your settings to your musical tastes. Deep bass lovers should capitalize on the bass enhancements.
Professionals
For calls and meetings, crystal-clear audio ensures you communicate effectively without technical hiccups.
Connecting and selecting headphones in Windows 11 is straightforward with the right guide. Prioritize driver updates and sound settings to ensure the best audio experience.
FAQ Section
Can Windows 11 automatically switch audio devices?
Yes, enable this feature under ‘Sound Control Panel’ for automatic switching.
What if my headphones aren’t showing up?
Check your connection and ensure Bluetooth is enabled.
Are all headphones compatible with Windows 11?
Most are, as long as they’re up-to-date with the latest drivers.
How do I manage multiple devices?
Use the Sound settings to switch between available devices.
Is it worth exploring third-party apps for my headphones?
Yes, especially if they offer enhanced settings for optimizing sound quality.
As Ryan Mitchell, I’d recommend keeping your audio settings customized and updated for the best experience. Happy listening and enjoy your Windows 11 audio journey with seamless connectivity and rich sound quality.
Credit : Source Post